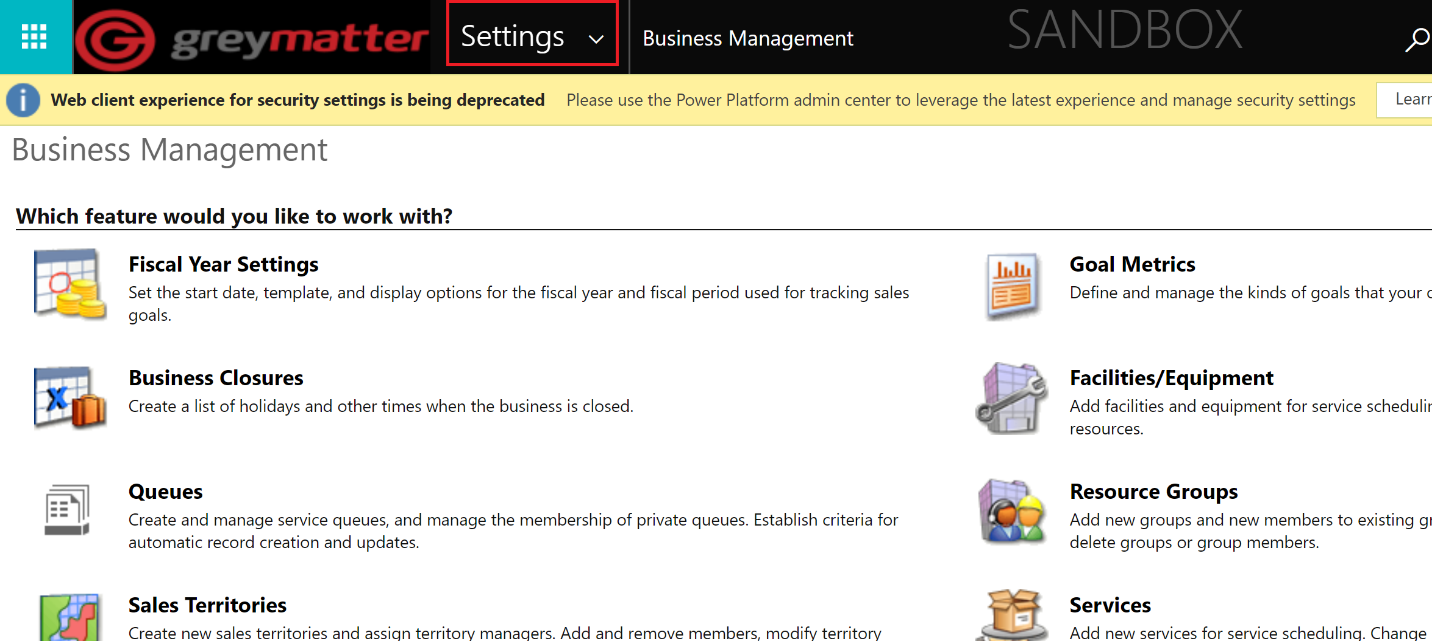
To create a System View, go to Advanced Settings

Once in Advanced Settings, click on Settings at the top to go to Customizations


From Customizations, select Customize the System, this will open a separate window.

Once in the Default Solutions window, under Components, click on Entities to expand the Entities list and select the Entity in which you want to create a new view for.

For this example we will create a new view for the Contact Entity. Expand the Contact entity and click on Views. Once in the views for the Contact Entity, click on the New button. This will open the View Creation wizard in a separate window.

The View Creation wizard will prompt you for information on the new View. Enter a name and a description for the new View you're creating.

For this example, let's create an Active Students View. The first thing we need to do is filter the search criteria for this view.

The filter defined for this search criteria uses the Active Contact Type field from the Contact Entity that equals Registered Students. Every record from the Contact entity whose Active Contact Type equals a Registered Student will show up in this view. You can add more filters but for this example we will only need this field. Once you are done editing the filter criteria, click OK at the bottom right.

Now we need the columns for our new view.

The information I want to be able to see from Active Students is their Email, the Program they’re enrolled in and Gender. Scroll down and select these columns from the Contact Entity fields and click OK.

This should be the result:

If you want to modify the order of these columns, select the column you want to move and use the arrows on the right side to adjust where the column will be placed.

Once you’ve added the columns you need for your new view and you’ve place them in the order you want, we can save this view. Select Save or Save As.

After saving, all there is left to do is publish the view from the Entity page inside the Default Solutions window.

After publishing, go back to the CRM and go to the Contact Entity (or the entity where you just created a view) and change the default view to your newly created view.

This is the new View you created.

Once in Advanced Settings, click on Settings at the top to go to Customizations
From Customizations, select Customize the System, this will open a separate window.
Once in the Default Solutions window, under Components, click on Entities to expand the Entities list and select the Entity in which you want to create a new view for.
For this example we will create a new view for the Contact Entity. Expand the Contact entity and click on Views. Once in the views for the Contact Entity, click on the New button. This will open the View Creation wizard in a separate window.
The View Creation wizard will prompt you for information on the new View. Enter a name and a description for the new View you're creating.
For this example, let's create an Active Students View. The first thing we need to do is filter the search criteria for this view.
The filter defined for this search criteria uses the Active Contact Type field from the Contact Entity that equals Registered Students. Every record from the Contact entity whose Active Contact Type equals a Registered Student will show up in this view. You can add more filters but for this example we will only need this field. Once you are done editing the filter criteria, click OK at the bottom right.
Now we need the columns for our new view.
The information I want to be able to see from Active Students is their Email, the Program they’re enrolled in and Gender. Scroll down and select these columns from the Contact Entity fields and click OK.
This should be the result:
If you want to modify the order of these columns, select the column you want to move and use the arrows on the right side to adjust where the column will be placed.
Once you’ve added the columns you need for your new view and you’ve place them in the order you want, we can save this view. Select Save or Save As.
After saving, all there is left to do is publish the view from the Entity page inside the Default Solutions window.
After publishing, go back to the CRM and go to the Contact Entity (or the entity where you just created a view) and change the default view to your newly created view.
This is the new View you created.

